Balance Exercises
Working on your balance can prevent falls and increase your mobility. Exercises that focus on balance work with specific muscle groups. Abdomen and sides straighten your core. Working on lower back and glutes are supporting your upper body. Lower body, diaphragm, and pelvic floor need strength training as well to improve your balance.
The most important idea is to incorporate your exercise in daily routine, the consistency is a key. The exercise can be done in sitting position (chair) or standing with support. You can always increase difficulty by adding number of repetitions and more time as you hold your body in the position.
Please see below balance focused exercises. You can hold onto stable support while performing these exercises. You need to wear comfortable walking shoes and someone who can supervise your first few sessions.
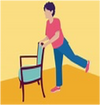
- 1. One Leg Lift. You can hold onto stable support while performing this exercise.
- Slowly lift one leg straight back, keeping your foot at a right angle, facing ahead. Hold for one or two seconds, then slowly bring it back down. Repeat 10 to 15 times.
- Repeat to the side, and to the front. Now, change it over to the left leg.
-
Walk Tight Rope. Just like it sounds, this is a heel to toe walk in a straight line.
- Place your heel directly in front of the toe of the front foot to step forward.
- It doesn’t sound like much, but is surprisingly challenging to do slowly, in control of each step.
- Try it for 20 steps to start, increasing the number as you get stronger.
- Rock the Boat.
- Stand with your feet directly underneath your hips, and your spine straight.
-
- Slowly transfer your weight to one right, lifting the opposite foot off the ground a few inches.
- Hold your leg up for as long as you can, but no longer than 30 seconds.
- Then, slowly transfer your weight back onto both feet and repeat the process on the opposite side.
- Begin with five repetitions per side.
Clock Reach (Noon To Six).
- You will probably need a chair to start out, holding it to the left.
- 12 is the position directly in front of you, 3 to the right, and 6 directly behind you.
- Raise your right arm and right leg and point to the 12 (in front of you), then the 3 (to the right), then the 6 (behind you), holding each position for at least 10 seconds.
- Shift the chair to the right, and then cycle with your left leg and arm raised from the 12 (in front of you) to the 9 (to the left) to the 6 (behind you) positions.
Plank-Like. Use wall or kitchen counter.
- Put your hand to the wall and move one step backwards, ensure your hands are still holding the wall and you are comfortable.
- Feet/Legs: Hip width apart, press back through the heels.
- Hips/Back: Spine straight, hips/glutes down in a straight line with shoulders.
- Engage glutes and front of quadriceps (front of the thighs).
- Shoulder Blades: Gently squeeze shoulder blades back, down and together.
- Abdominals: ENGAGED, draw navel up towards the spine to prevent the back from arching (sticking butt up in the air) or hips sinking down too low.
- Elbows/Hands: Line up with shoulders.
- Chest: Line up in between arms/hands, keep body elongated tall.
- Head: In line with spine, chin tucked, avoid dropping head.
- Hold the plank, breathing deeply, working through your diaphragm. Inhale through the nose and exhale all the air out through the mouth (like blowing up a balloon).
- Practice it 2-3 times, holding body in this position for 5 seconds.
